
During this part of the article series dedicated to NAS4Free install on VMware we’ll explore how to prepare NAS4Free storage that will be configured as iSCSI targets to present to a SQL Failover Cluster. The process is very easy and essentially it is a matter of:
- Adding Disk Drives (VMDKs) to NAS4Free virtual machine
- Importing Disks to NAS4Free and format them using ZFS file system
- Creating Virtual Disks in NAS4Free
- Adding Virtual Disks to Pools
How to prepare NAS4Free Storage
We can add new drives by editing virtual machine settings also whilst the NAS4Free server is running.
The screenshot below shows the wizard options for creating the first drive which will be used for the Quorum Disk. 1GB size is more than enough and whenever possible I would recommend to choose Thick provisioned over Thin provisioned.
Also let’s make sure disk mode is “Dependent”. This will make Backups of this VM possible and most of all should there be virtual machine reboots the changes won’t be lost.

To help prepare NAS4Free storage we can now add more drives for the rest of the required volumes for the SQL Failover Cluster. In my case for my my home lab I have created an additional 4 drives to accommodate this installation and it will look like the following:
- Hard Disk 1 (System disk with Boot, Swap and Data Partitions) 20 GB
- Hard Disk 2 (Quorum Disk) 1 GB
- Hard Disk 3 (SQL Backup disk. Mapped to B:\ Drive) 20 GB
- Hard Disk 4 (SQL Data disk. Mapped to F:\ Drive) 20 GB
- Hard Disk 5 (SQL Log disk. Mapped to L:\ Drive) 20 GB
- Hard Disk 6 (SQL TempDB disk. Mapped to T:\ Drive) 20 GB

Now that we have created and attached the drives to the VM it’s now time to move to the Web GUI and progress the configuration from there. All we have to do in the first place is to make NAS4Free Storage aware of new drives been attached to the iSCSI controller.
Let’s browse Disks > Management > HDD Management and click on the “+” button to individually select which HDDs to import or click on the “Import” button to load all drives in one go.

The result will look something similar to this. Once ready hit “apply changes” to confirm.

Next step is to format the drives with a file system NAS4Free can use to perform other operations. NAS4Free ships with the ZFS file system and this one will be used to present the volumes as iSCSI targets.
I would recommend to select them individually and start the wizard to format the drives. Otherwise they will be configured as part of the same ZFS Storage Pool. In our example each pool consists of single drives! Naturally it is possible to expand them when required.

Very quickly after selecting the drive let’s specify the Volume label and leave the other settings untouched.
Note: I would strongly suggest to make sure there are no white spaces in the names we specify. Even the ones at the beginning or end of the text string that might occur by mistake. For example “Quorum” and ” Quorum” or “Quorum “. Eventually replace white spaces with dashes “-“.

Once ready we can now hit on format and proceed.

The process will take a few seconds and the output can be seen as per screenshot below.

Let’s now repeat the same steps for the other drives and the result will be something similar to this one below.

Once the disks have been formatted the next step is to create “Virtual Disks” in NAS4Free. From the Disks > ZFS > Pools > Virtual Devices page we can start adding the drives one by one. The screenshot below shows the steps for the Quorum disk which I have called “VD-Quorum”.
As soon the device is selected then let’s hit on STRIPE to specify how the blocks will be allocated on the Disk. With one disk it is a simple unit. But interestingly enough when selecting more drives we can also choose between several RAID options, rather than cache, log or even hot spare. It’s fantastic to have these options there.
Of course they are more effective when using separate drive spins. In a nutshell: all the the drives we are adding are based on several VMDKs served by the same physical VMware Datastore. So unless we are configuring “drives” physically sitting on separated Datastores on separated storage hardware there would be a minimal improvement when compared to these.
So when planning for a “production” install in our home lab let’s take into consideration these aspects as well!

As per usual let’s hit on “Apply changes” to commit changes.
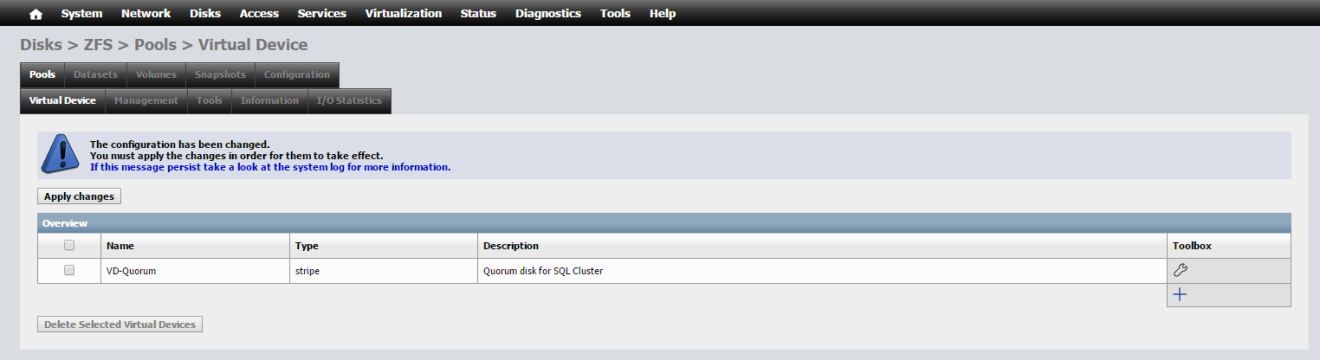
The end result will look to something similar to the one below.

We are getting to the final stages of the configuration: Creating Pools of (Virtual) Disks. To do this from the same menu let’s go into Disks > ZFS > Pool > Management page and let’s add the the first Pool for the Quorum Disk. As seen earlier the different Pools in this case are consisting of single Virtual Disks.
The screenshot below shows the steps for the first one. Again I would recommend NOT to use any white space in the name which would cause the iSCSI Target service failing to start otherwise.

As per screenshot the Quorum Pool with one disk is active and running.

And with a similar approach the final result with all Pools created will look similar to the screnshot below.

What is interesting it is also the extra information we can get from the Information tab.

Including some nice statistics as well which are updated real time.

If you want to have info about Pools at a glance there is a nice new addition in the home page too. And in this case I will let you discover this by yourself!
We have seen in this post how to prepare new NAS4Free storage and configuring this one by mean of Virtual Disks and Pools formatted with the ZFS file system. They constitute the foundation for the next part where we’ll be able to configure them as iSCSI targets.


Add Comment