
Very recently Veeam has released a fresh image of Veeam Backup & Replication including the latest updates to version 9.5 Update 2. Since I’m currently in the process of upgrading my home lab I have decided to give to this release a spin! This update comes with a lot of improvements and fixes. The list below simply shows the main ones from the Veeam website:
Platform support
- Cisco HyperFlex Systems
- HPE 3PAR StoreServ 3.3.1
- Microsoft Hyper-V
- Microsoft Exchange 2016 CU5
- NetApp ONTAP 9.1
- Oracle 12.2
- Veeam Agent for Linux 1.0 Update 1
- Veeam Agent for Microsoft Windows 2.0
- VMware vCloud Director 8.20
- VMware vSAN 6.6
Plus enhancements and bug fixes:
- File-level recovery
- Replication
- Storage integration
- Tape
- User interface
- PowerShell
- Setup
I would highly recommend to install this release or at least update to this one by applying the latest version as per instructions provided on the Veeam Knowledge Base article KB2283. I once had a customer telling me he was using the “SureBackup” and “OnDemand Sandbox” features to test and release the upgrades to the Veeam Backup & Replication platform itself!
For the purpose of this article we’ll be using the Veaam Availability Suite (VAS for short) which is essentially the Veeam Backup & Replication (VBR from now on) coupled with Veeam ONE. The latter is a platform offering Monitoring, real-time Alerting and comprehensive Reporting not just for the Virtual Infrastructure but also for the Backup Infrastructure offering very detailed information. The good news is Veeam ONE also comes with FREE version with reduced functionalities compared to Enterprise version but no time limitation. We’ll cover Veeam ONE in a different set of articles exploring initial deployment, setup and configurations.
Personally I found one of the most interesting features is the ability for the Veeam Agents to send their Backups to the main VBR. This is a feature available from VBR 9.5 update 2. De-facto we can now easily consolidate the Backups by also consolidating the Policies Most importantly the Backup data that belongs to external employees or from users working in Remote Branch Offices can now be stored into central Backup Repositories hence increasing Data Availability. More on these topics will be elaborated in dedicated articles.
So for this Veeam Backup & Replication overview the intent is to cover the main aspects with regards to the initial deployment and configuration setup. In particular the following aspects will focus on:
- Install Veeam Backup Replication
- Configure Veeam Backup & Replication
- Manage VMware Backup Infrastructure
- Add Veeam Windows Backup Proxies
- Create Veaam CIFS Backup Repository
- Add Veeam Hyper-V Backup Proxies
- Configure Veeam Backup Jobs
- Configure Veeam Backup Copy Jobs
- Create Veeam Linux Backup Repository
This is just an initial list and can grow based on the current feedback and available resources in my home lab!
Install Veeam Backup & Replication
Once we have obtained the installation file from the Veeam website all we have have to do is to mount the ISO. I would personally recommend to download the Availability Suite installation as it included the latest versions of VBR and ONE. Plus into the same installer we can deploy additional components very helpful in particular within Enterprise environments. Backup Enterprise Manager (BEM for short) consolidates all VBR Server installations into one single pane of glass. a single location to manage all Backup Servers installed in the estate including the geographically dispersed ones like in RoBo scenarios. Additional Backup & Replication Consoles provide the ability to remotely connect to VBR Servers avoiding to login to RDP session thus reducing the number of ports and network traffic.And last but not least Veeam One Monitor Client. In a different article we’ll cover Veeam ONE separately which requires a Veeam ONE server. The Monitor Client can additionally be deployed in remote locations or to different machines with the role based administration access.
In this case let’s start with the main green button!

As per usual let’s read and accept the terms for the EULA agreement

Let’s provide a license to benefit from the “Enterprise” features. It is also possible to get NFR licences for certified professionals. If you qualify for any of the listed qualification than why not getting a new license? More info from this page

From here we can specify the default location for the install. One thing to consider as highlighted later on is the option to install different components on separate volumes. The installation itself doesn’t really require so much space. 2GB free space for installation is the minimum recommended. Other components like Microsoft .NET 4.5.2 might require more space around 5GB. An additional 10GB should be planned as well in order to accommodate the Guests File System Catalog (around 100 VMs) and VM Instant Recovery for its cache folder. In my home lab I always start with 40GB VMDK disks and they are definitely fit for the purpose

In the next step as per screenshots below the installer will automatically check for the missing dependencies offering an automatic install and Re-run options

Now that all dependencies are satisfied let’s proceed with the next steps

At this point depending on the current resources we can decide to leave the default settings or specify custom ones. For my home lab I will go with custom settings as I want to specify a different location where to deploy the installation binaries, vPower cache folder and Guest catalog folder for the indexing options. Last but not least I want to point to a SQL Cluster rather than a local MSDE Database. I’m not definitely hitting the maximum supported database size (10GB on MSDE). Surely I can benefit for better performance and management pointing to a SQL cluster

From here we can specify the account under which the VBR server will run. I would suggest to make sure a dedicated account is created. Also it would be easier to grant permissions at different levels. In particular on the local server where VBR is installed, on SQL Server where the Veeam VBR database will be created and the VMs for application awareness interaction

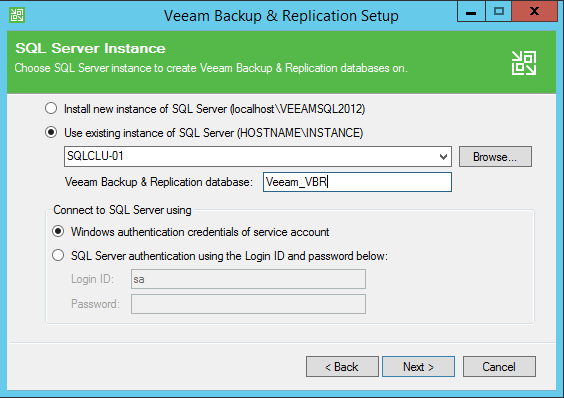
As per previous comments above I will choose a dedicated SQL server

From here we can point to the SQL instance available. The Veeam VBR database can be pre-created. It is also a good way to test the required permission for the dedicated Veeam account in advance
Here we are with the Veeam VBR default network ports. Eventually if already in use we can change them according to needs

In this step of the wizard we can provide the location where the vPower and Guest File System index will take place. I would recommend to choose a drive with enough space according to needs. Minimum 10GB to cover 100 VMs guest index. For vPower NFS a dedicated drive is worth more than a massive amount of free space. As it just caches the “temporary” data whilst the VM is recovering during mount operation. Of course let’s make sure we select a volume with enough space to accept the redirects of a highly intense operations like a Database server

We can now review the main settings for the Veeam deployment and confirm with an install. Let’s also leave the Update Check enabled

At this point the wizard holds all the necessary information to perform the initial deployment. This phase is not too long and really takes a few minutes

A final screen also stating the final status of the installation

As soon as we click on finish the wizard asks to restart the the server

Once the Server is back online from the Desktop a new icon will launch the Veeam Backup and Replication console. This is context sensitive. Of course it is also possible to start this console with a “RunAs” command and use a custom account

Since this is the very first install of VBR and its component the engine itself is making sure all components are up to date. Let’s hit on apply in order to proceed. By default the Mount server and VPower NFS are always part of the main Server. We’ll see the installation of these components also when covering the installation of Veeam Backup Proxies and Backup Repositories

A few moments later these all the required components are up to date. Next will be the first configuration of Veeam VBR

This concludes the first part of the Veeam Backup & Replication overview. In the next article we’ll go into more details about Configurations, Backup Jobs and Backup Repositories. Hopefully this article is exhaustive with regards to a first time installation. I’m happy to invite for the next articles on the series and to receive feedback on the next topics to cover


[…] The purpose is to learn about this solution and see this one in action and in particular with Veeam Backup & Replication. The aim is to leverage the software defined storage options to create several types of storage […]